

Munchkin and I are happy to be part of the Elmer’s Projects for Great Futures Program which benefits the Boys & Girls Clubs of America. We were given the task of coming up with a creative project using an Elmer’s Tri-Fold Board from Walmart. Once we completed the project, we needed to submit a picture of our project along with the required information according to the specified rules. You can join us and submit your own projects until December 12, 2011. Elmer’s will chose finalists based on originality and creativity. On December 14th, visit http://www.greatfutures.org/elmers to see the finalists and start voting. Boys & Girls Clubs of America will receive $1 for every vote up to $50,000. The finalist with the most votes wins. The club closest the Walmart where the winner purchase their tri-fold board will receive a $5,000 Walmart gift card and $1,000 in Elmer’s products.

Before starting a project, I like to lay out all of the supplies that I’ll need and then some – “just in case”.
Supplies Used:
- Elmer’s small tri-fold board
- Elmer’s Tape Runner
- Elmer’s Memory Book Glue Pen (or Elmer’s CraftBOND dual tip glue pen or X-TREME School Glue Stick) (1)
- Elmer’s CraftBOND glue spots – pop-up medium
- Elmer’s School Glue
- Elmer’s glitter glue pens (or Elmer’s Galactic Glue Blue for a little sparkle)
- X-ACTO Decorative scissors
- Scissors
- Small hole punch
- Regular sized hole punch
- Ruler
- 8 pieces of brown construction paper
- Wood pencil
- Small strand of white Christmas lights
- Nativity characters that we designed (another option is available here)

Start off by taking the Elmer’s Tri-fold Board and measuring the width of one of the sides. Once you determine that measurement, you’ll measure that far down from the top of the tri-fold board. For us, that measurement was roughly 5 1/4 inches. Once you make your markings from the top, go ahead and draw a line across the board using a ruler.

Cut along the line with either scissors or an x-acto knife to create two boards. One will be larger for the building, and one will be smaller for the roof.

This is what the building will look like once it’s cut out. Next, we’re going to cover the tri-fold boards.

Coat the larger board with a glue of your choice (1). Make sure you get the edges of the board really well as well as around the creases.

Smooth down the pieces of brown construction paper onto the glue treated surface. You can measure the pieces or you can just overlap them as I did. Trim the edges of the paper to line up with the board.

Flip over the board and repeat the process.

Locate the natural fold in the tri-fold board. Take the ruler and score the construction paper with an x-acto knife (be careful not to cut through the whole board).

Scoring the construction paper will allow it to fold properly.

Repeat the above steps for the smaller tri-fold board (the roof) except this time, you’re going to trim the construction paper with decorative scissors to create a fun edge on the paper.

Don’t forget to score the paper again as you’ll want the roof to be able to bend.

You now have the basic structure. It’s time to add the extra pieces.

Take a strip of the extra brown construction paper and wrap it around a wooden (unsharpened) pencil. Take a paperclip and create a hanger for the angel by pushing one end into the eraser and make a hook with the other.

Skip this step if you do not want to add lights to your Nativity Scene. We used a strand of 20 white Christmas lights. Based upon the number of lights in your strand, you’ll calculate where the lights need to be on the tri-fold board. Mark out the placement. Using a hole punch, make holes in the tri-fold board.

Note that I switched to a better hole punch… Also, do not make the mistake that I made – make sure that you count the holes properly. Otherwise, you’ll end up with a hole with no light.

Put one lightbulb into each hole making sure you push it through so the bulb isn’t actually touching the cardboard. It make take some firm pressure to achieve this as the hole will be slightly smaller than the bulb. Once you have the bulbs in, you’ll attach your angel hanger to the back of the building using the glue spots.

Cut out all of the Nativity figures. Punch a small hole in the angel wing, so the angel will be able to hang from your hook.

Decorate the angel with the glitter glue pens or the galaxy glue. You can decorate the other figures if desired.

Using the stand patterns, cut stand pieces out of cardboard (cereal boxes work well). Score on the line to allow the pieces to easily bend.

Attach the stands to the figures using the glue runner (or other method of your choice).

You can now display your Nativity or you can jazz it up a bit by adding hay/straw to the roof. The sides can be decorated as well. Munchkin is thinking about adding sand to the sides for texture.


Munchkin and I had a lot of fun going shopping at Walmart for the supplies we needed for this project, but we were really disappointed to see that Walmart did not have any Nativity scenes at all in the store. It really is what inspired us to do the Nativity completely from scratch. Originally, we thought we’d be able to add some store bought items, but since that wasn’t possible, we got more creative. It meant a little more work for me as I needed to create the characters because Munchkin wanted a certain look.
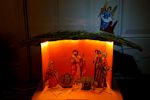
While I’m showing a completed project here, I don’t think it’s truly complete as Munchkin has plans on ways to add more texture to it. We also decided that we need to figure out a way to light the angel when the Nativity scene is lit up. She says that we need a star. **grin** If she does add more, I’ll add an updated picture.

This project has been compensated as part of a social shopper insights study for Elmer’s #gluenglitter #collectivebias #CBias Collective Bias. All opinions and images are my own.
That came out just lovely!!!!
Giggly Girls recently posted..Review: ARTistic Pursuits
Thank you!
Love your project – great pictures to guide everyone along.
Kathy Murphy recently posted..Soup & Bread Benefit Event and Cook Book Review
Thanks. I’m not use to documenting like that, so it was an interesting process. 🙂 The good thing is that it made me think through everything ahead of time. 😉
I am always in awe of how creative you are!! This is a wonderful idea and so pretty. Good job to Munchkin, also:)
Heather recently posted..Current Giveaways
On this one, my husband asked me how I came up with doing that from just looking at the tri-fold board because he just couldn’t imagine it. lol! It was just something that popped into my head…
So creative, and super cute too! You’re tutorial is superb. I may just have to steal this idea for my kiddos. 🙂
Angie recently posted..‘Prep and Landing’ Now on DVD from Disney!
Thank you! It’s definitely a fun project for everyone, and no two will turn out exactly the same. 🙂
That’s so cute! Love it!
Amy recently posted..Elmer’s #LooksForLess Challenge And Giveaway
Thanks!
Wow!! That is so adorable! I love how it looks when it is dark with the light inside glowing. Best of luck on the contest!
Tonia recently posted..Christmas Tableware & Dining Room Decor #SearsRealCheer
Thank you! We were really pleased with how it turned out with the addition of the lights. It was one of those things that we didn’t know how well it would work until we tried. 😉
So inspiring Heather!
Thanks – I’m glad that it will inspire others.
You guys, well ladies, did a great job!
Briana recently posted..TOS Crew Review: Pitsco Medieval Machines
Thank you. We’re not pc around here, so we’re okay with guys. 😉
Awesome!!! I just love your blog 🙂
Mary recently posted..Banned Again – Well Trained Mind Boards
You’re too sweet. Thanks!
That was a lot of work – but well-worth it! Great job!
Erika recently posted..Nothing But A Miracle
Thanks. I think writing up the tutorial may have taken longer than actually making the project. lol!
I love this! Good luck entering the contest – let us know if you’re a finalist!
Amy recently posted..It’s the most wonderful time of the year…
Will do! Thanks!
That turned out lovely! what a great idea – and I especially love adding the lights. That “makes” it! Good luck in the contest!
Kym recently posted..Playing Favorites – Beethoven
While the lights were a bit of a pain, I do think it’s worth it. Thanks!
Wow, this is amazing. Good luck with the contest!
Thanks Lori!
In case you notice a spike in visits, I just “pinned” this onto my Holiday Ideas board at Pinterest so I can remember where I saw it! 🙂
Becky K. recently posted..Words that sting…from a 9-year-old
Thank you for the pin! 🙂
As always, you have such creative ideas. The lights were a nice extra. Did you end up adding a star?
Jennifer recently posted..Homeschool Crew Review: Vintage Remedies for Girls
No because she couldn’t figure out exactly what she wanted and how she wanted to do it. Eventually, I have a feeling there will be a star. 😉
[…] their hands busy while they listen to the scripture reading or while the family watches the movie. Making your own nativity scene or nativity craft is a nice way to wrap up your study. Whatever you do, don’t forget to keep your […]